
Soundproof(er) Sound Booth 6’ x 6’ Assembly Instructions
Frame Assembly
Booth Materials
- (4) 70G Producer’s Choice blankets with Velcro Ties
- (2) Left-angled soundblocking wall panels
- (2) Right-angled soundblocking wall panels
- (3) straight soundblocking wall panels, 1 door panel
- (2) soundblocking roof panels
- (2) long corner sealing strips with notch
- (2) extra long single Velcro corner sealing strips
- (6) long single Velcro corner sealing strips
- (3) long double Velcro corner sealing strips
- (4) corner sealing pieces
Also included:
40 straight poles
4 Ceiling Straps
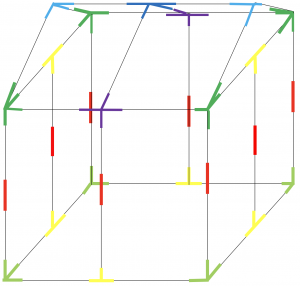
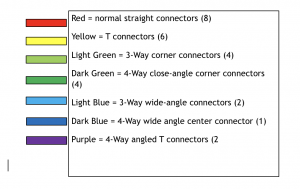
- Assemble the bottom square of the frame using 8 straight poles, 4 light green connectors, and 4 yellow connectors. On the light green connectors, be sure that the prong with two holes in it is pointing up.
- Use 16 straight poles and 8 straight connectors to make 8 double-long poles.
- Use the dark green connectors, the remaining 2 yellow connectors, the light blue connectors, and 6 straight poles to form two triangles.
- Use the remaining straight poles, purple connectors, and the dark blue connector to finish the roof. Lift this on top of the double-long poles and click into place to complete the frame.
- Attach the 70G acoustic blankets with the Velcro straps all around the frame.
- Attach the roof soundblocking panels to the top of the frame, and seal the middle with one of the long double Velcro corner sealing strips.
- Hang the soundblocking wall panels on the frame. The pointed panels go underneath the pitched part of the frame, while the straight-topped panels go on the other sides, with the door panel.
- Place the extra long single Velcro corner sealing strips vertically on the booth on the sides with the pitched roof.
- Place the long single Velcro corner sealing strips vertically along the four corners and two straight-topped sides so there is one on top of every vertical pole in the frame.
- Place the long double Velcro corner sealing strips with the notch along the top of the booth where the roof is pitched. The notch allows it to bend at the center.
- The last two long double Velcro corner sealing strips go above the flat-topped wall panels. Now all the places where the wall panels meet should be covered.
- Place the last four corner sealing pieces to cover the four exposed corners.
- Use the remaining straight poles and Y connectors to support the lights.
